Getting Started
This section guides how to install XStore from developement tool installation to system integration. It's recommend that you completed the system integration in this section to make sure the software is installed correctly before adding any customizations or extra codes to the project.
1. Development Environment Installation
a. Installing Xamarin
Choose an Operating System where you are installing Xamarin:
Mac OS:
Refer to this Step-by-step instructions.
Or below Video instructions:
Windows:
Refer to this Step-by-step instructions.
Or below Video instructions:
b. Build your first Xamarin.Forms App
This step describes how to create a new Example Xamarin Forms project, build and run the app.
note
Please note that this optional step just to make sure that environment is setup correctly. If you're expericenced in Xamarin then can skip this step.
- Open Visual Studio and select Create new project
- Search for "Xamarin" or choose Mobile from the Project type menu. Select the Mobile App (Xamarin.Forms) project type
- Choose a project name – for example "AwesomeApp"
- Click on the Blank project type and ensure Android and iOS are selected
- Wait until the NuGet packages are restored (a "Restore completed" message will appear in the status bar).
- New Visual Studio 2019 installations won't have an Android emulator configured. Click the dropdown arrow on the Debug button and choose Create Android Emulator to launch the emulator creation screen.
- In the emulator creation screen, use the default settings and click the Create button
- Creating an emulator will return you to the Device Manager window. Click the Start button to launch the new emulator.
- Visual Studio 2019 should now show the name of the new emulator on the Debug button
- Click the Debug button to build and deploy the application to the Android emulator.
Congratulation!! Your machine environment is ready, let get started to install XStore project.
Video instruction:
2. Run XStore with default demo website
This step show how to build and run the app with our WooCommerce demo website, it's expected that you can run the app as what you have seen in our Demo.
Video instruction:
Step by step:
- After download and unzip the package, use Visual Studio to open the solution .sln under Sourcecode folder.
- Click Build > Clean Solution
- Click the Debug button to build and deploy the application to the Android emulator
note
If you got any errors in this section, please see the Common Issues section to find the error information and tip to solve it. In case you couldn't find solution, feel free to contact us for further support.
3. Integrate XStore with WooCommerce website
a. WooCommerce Website Setup
important
This section describes how to setup Wordpress website with WooCommerce and all required plugins. It's important that you follow the instruction to make sure the website is setup properly.
For your quickly setup, we included Pre-config website in the downloaded package. You can install this pre-config website to your local or live Wordpress hosting. See Quick Installation section for installation using Pre-config website.
If you want to setup new Wordpress site or use your existing Wordpress website, please go to section New or Existing Wordpress Setup.
I. Quick Installation
Find the preconfig website in your downloaded package, you can install this website to either localhost or live hosting.
Video guide setup on localhost:
Video guide setup on live hosting:
II. New or Existing Wordpress Setup
Following steps show installation on a fresh Wordpress website. This guide is based on our demo site at http://woocommerce.tlssoftwarevn.com
Step 1: Setup Rest API
The default Woocommerce supports the Rest API, but we need following steps to enable the API:
- Requirements:
Custom permalinks must be enabled at: Settings > Permalinks. Default permalinks will not work.
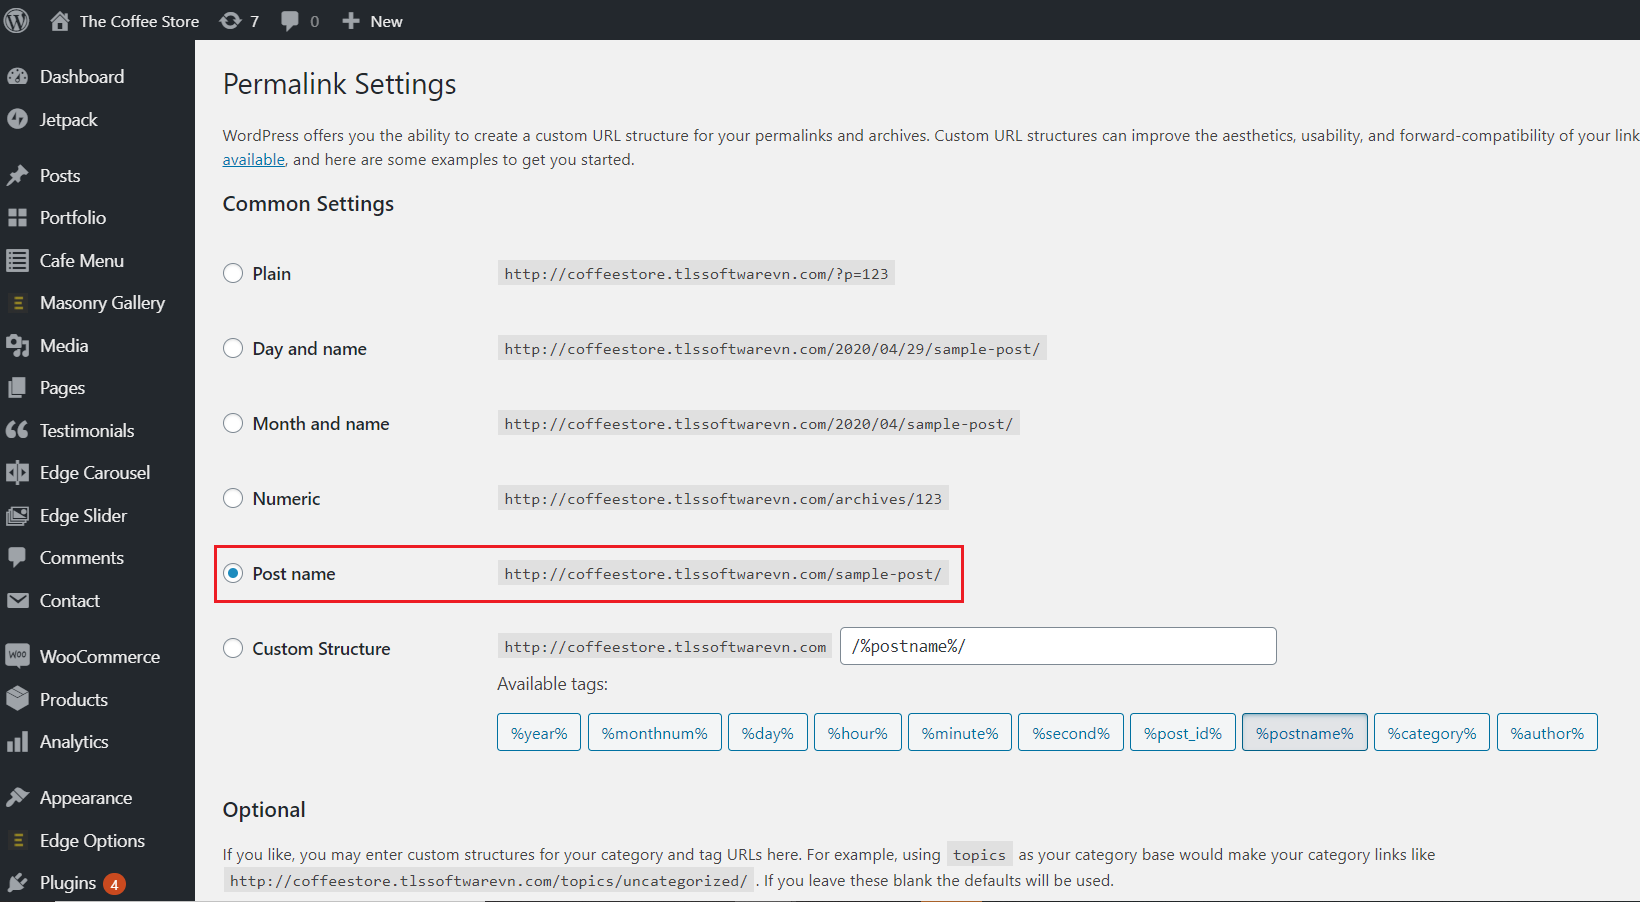
Membership registration: Enable the option Anyone can register.

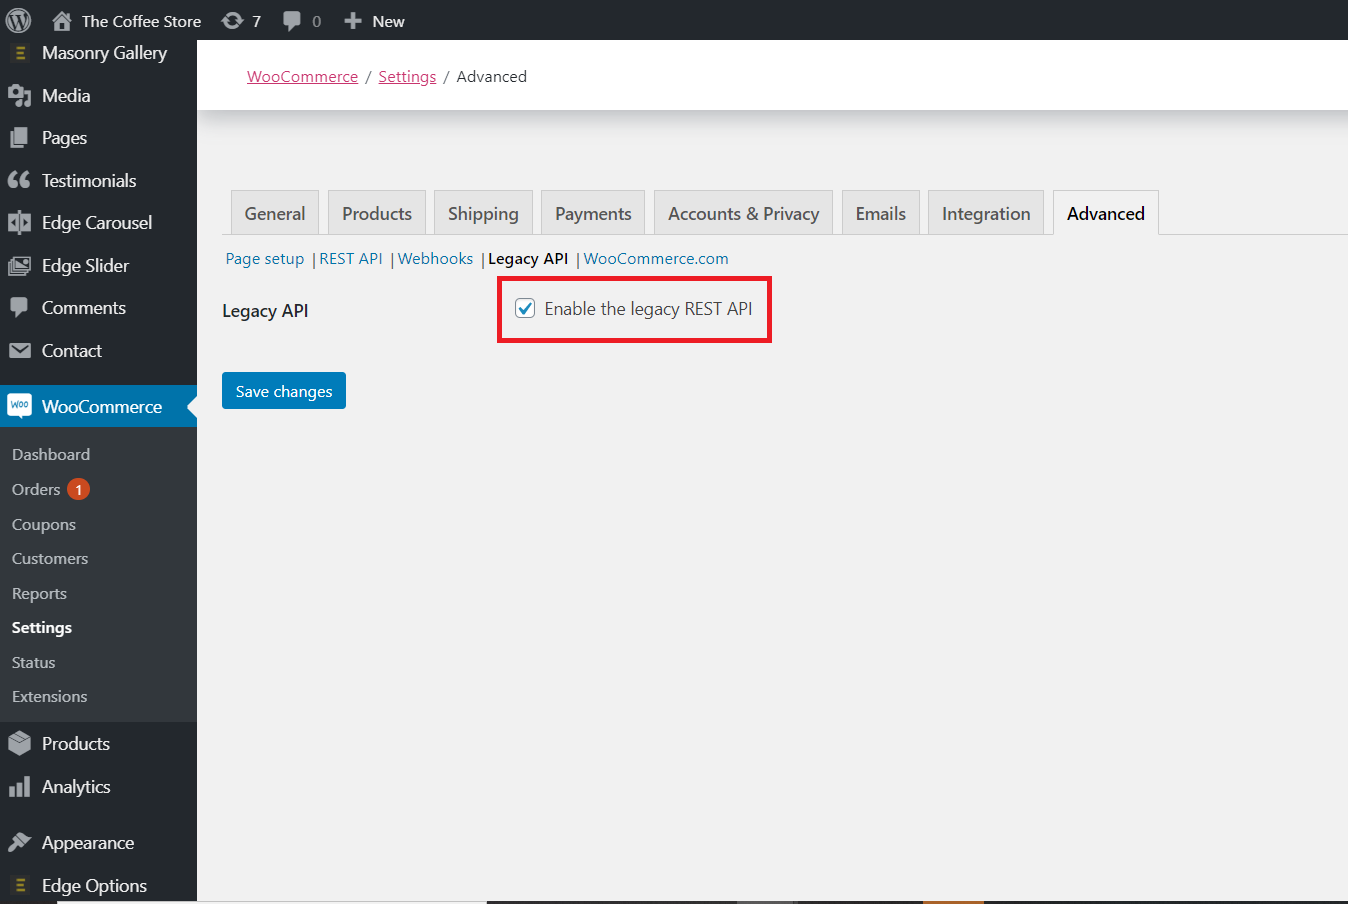
- Enable REST API:
To enable the REST API for WooCommerce, go to WooCommerce > Settings > Advanced >Legacy API and tick the Enable REST API checkbox.
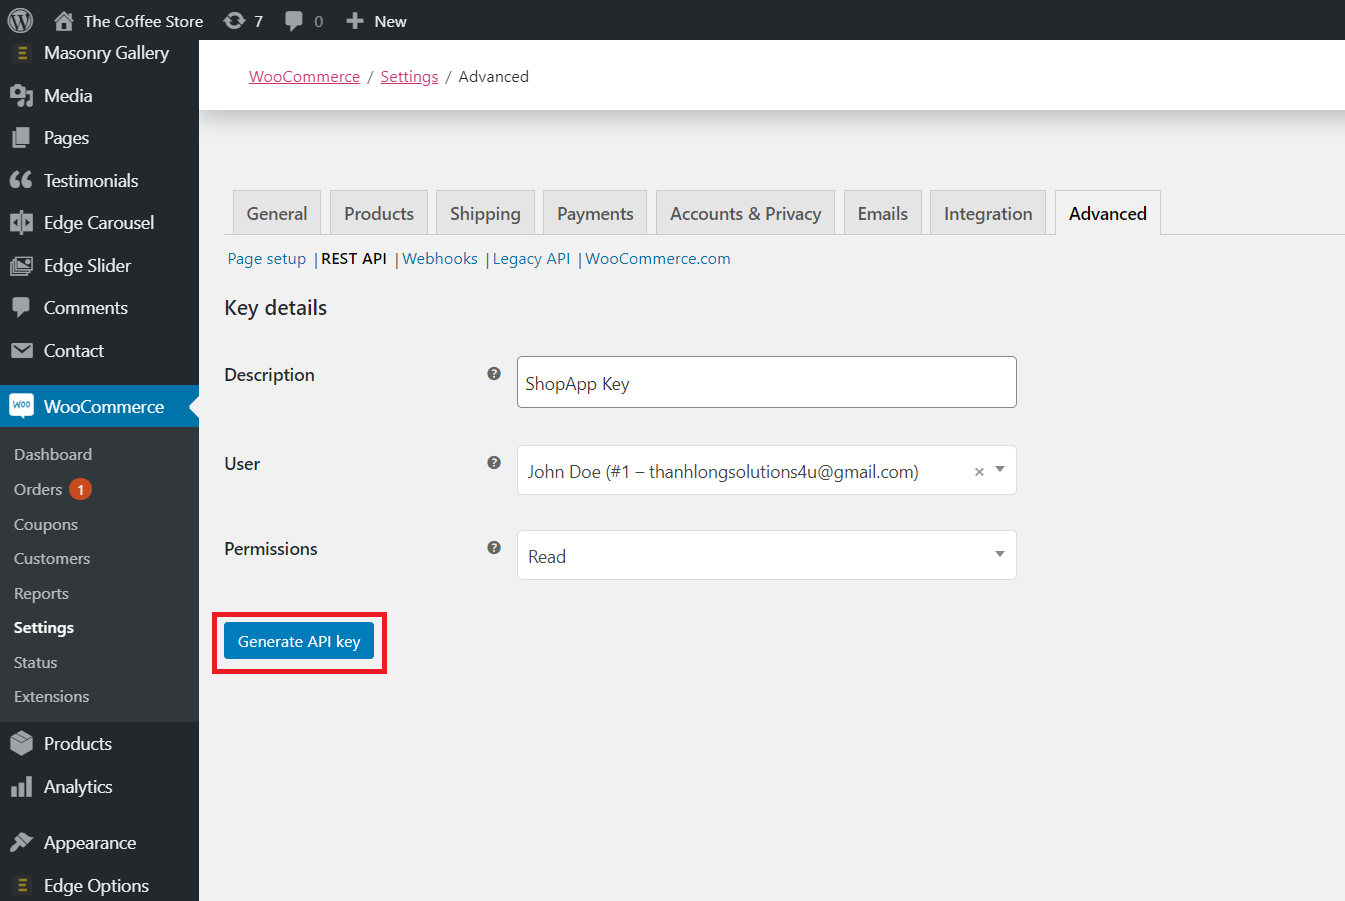
- Generate API keys:
The WooCommerce REST API uses authenticated-key to control API access. These keys are linked to WordPress users on your website.
To create or manage keys for a specific WordPress user:
- Go to: WooCommerce > Settings > Advanced > REST API.
- Select Add Key to open Key Details screen.
- Add key Description.
- Select User you would like to generate a key for in the dropdown.
- Select access priviledge for this API key — Read access, Write access or Read/Write access.
- Select Generate API Key to generate the key.
Once key is generated, you should see Consumer key and Consumer secret keys, a QRCode.
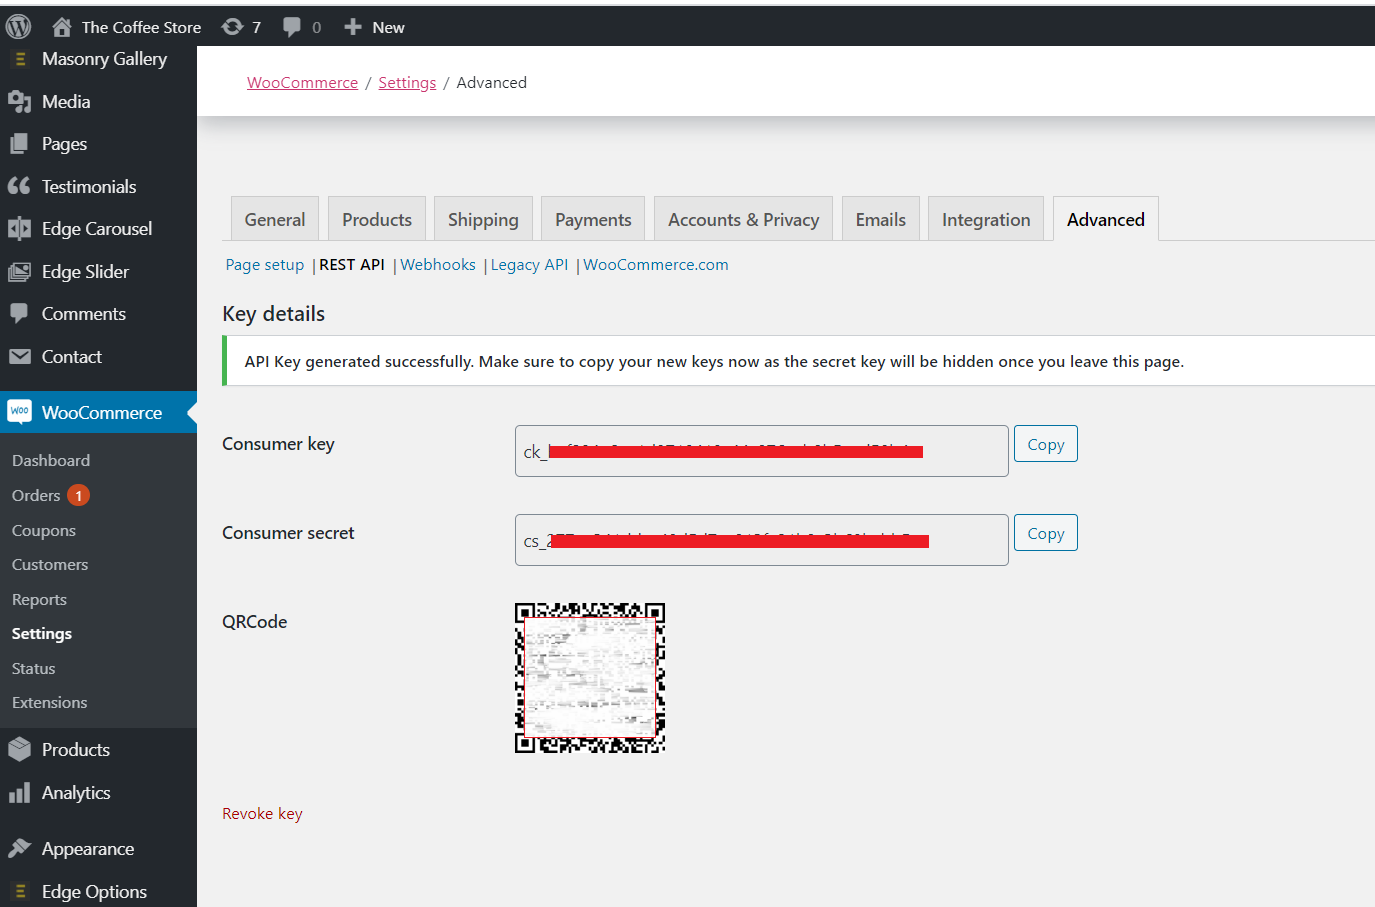
Please copy these keys for later use in next step in the application configuration. You should save this API key in a safe place since WooCommerce won't show it again after you close this windows.
tip
To learn more about WooCommerce REST API: WooCommerce REST API Client Library
- Test if the API is working
Simply open a web browser to http://your-website-url/wp-json/wc/v3, if you can see list of JSON returned meant that the API config is correct. You're ready to move to next step.
Step 2: Install the required plugins
Below are plugins required to work with XStore:
- Jetpack: This plugin allows image caching for mobile client app.
- WP REST API (Version 2): This plugin as it named to provide REST API, supports HTTP. Grab your site’s data in simple JSON format, including users, posts, taxonomies and more. Retrieving or updating data is as simple as sending a HTTP request.
- Simple JWT Authentication: This plugin extends the WP REST API using JSON Web Tokens Authentication as an authentication method.
note
These plugins are available from the downloaded package at WP-Plugin folder.
After installed, make sure that all plugins are Active. You can use these zip file and install them like other Wordpress plugins.
Step 3: Config Simple JWT Authentication plugin:
1. Enable PHP HTTP Authorization Header
- Shared Hosts:
Most of the shared hosts have disabled the HTTP Authorization Header by default. To enable this option you'll need to edit your .htaccess file by adding the following:
- WPEngine:
To enable this option you'll need to edit your .htaccess file by adding the following:
2. Configuration
In Wordpress dashboard, go to Settings > Simple JWT Authentication :
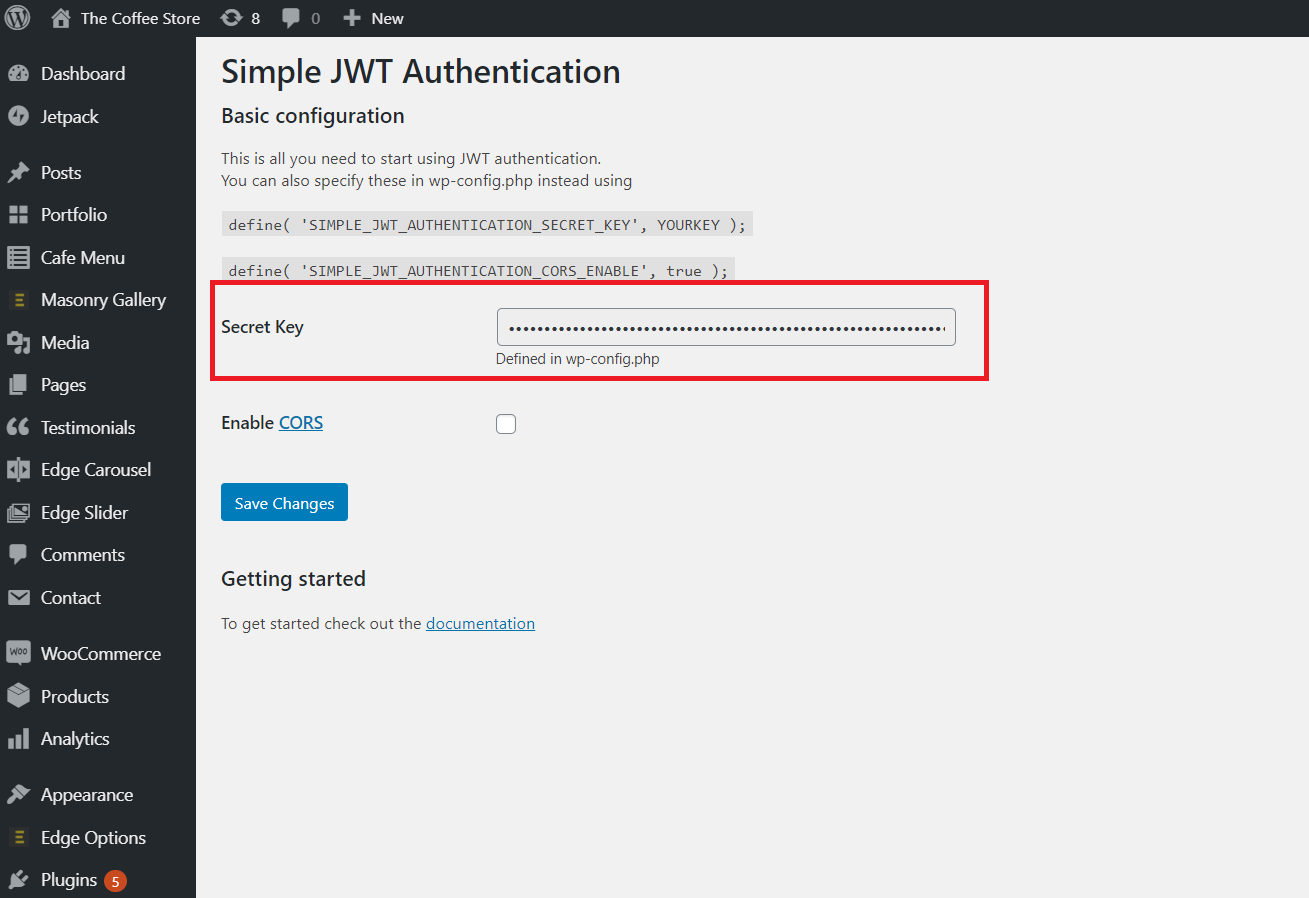
The JWT needs a Secret Key to sign the token. This secret key must be unique and never revealed.
You can use a string from here https://api.wordpress.org/secret-key/1.1/salt/
b. Mobile Application Setup
After Woocomerce website is setup with all required plugins are installed and well configured, you're now ready to setup XStore mobile application.
This section guide how to setup mobile app to connect and work with WooCommerce website installed in previous step.
important
If you'setting the website in local machine, please make sure that you use the local IP address, so that the mobile app can connect.
4. Next Step
Go to next Customization to know more about how to customize the design/interface of your app.
Then go to Publish to Appstore or GooglePlay
During installation, if you got any issue, please 1st go to Common Questions to see list of common issues and solutions to fix it.